
What is a compressor?
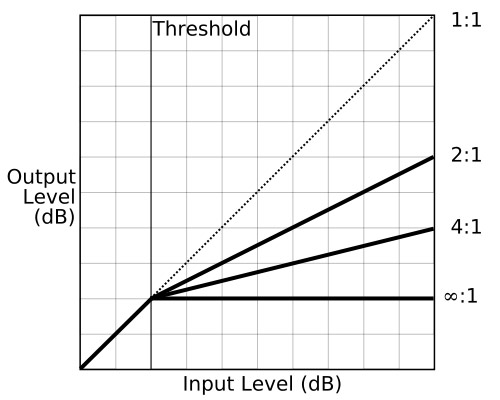
A compressor deals in dynamics, which is the difference between the loud and the quiet parts of a sound or a passage of audio. The compressor automatically controls volume levels based upon a few simple settings. Threshold – the level at which incoming audio activates the compressor. Attack – the period of time the compressor takes to begin lowering the level of the audio at the ratio you set. Ratio – the amount of reduction in level that happens, for example 3:1 meaning for every 3db of audio above the set threshold it lets through only 1db; and finally the Release – which is the time it takes for the compressor to stop compressing after the input signal level dips back down below the threshold level. There are more controls on some compressors that provide extra options but we will cover them later, with these basic controls you pretty much have everything you need.
What were they invented for?
So why would we need such a tool? When you record something or someone, for example a lead vocal, it’s natural for some words to be much louder than others. Sometimes this can be intended to add emphasis and sometimes it can be completely accidental. These kinds of variations in levels can be a real headache when you’re trying to mix a track, with words getting lost in the mix whilst others are coming up too strong. You could then spend time using volume automation to get everything nice and musically even, and in fact that was often done. The compressor is basically an Automatic Volume control, a tool which in this “macro” sense can help even out a passage of audio by bringing the level of the loudest parts down and therefor restricting the dynamic range and making life a whole lot easier for the persons whose job is to bring everything together in a nice tidy mix.
In a more modern context we often use the compressor in a micro way as opposed to the macro way. We use it to effect the dynamic balance on individual sounds for example a kick drum, to give it more attack or conversely more body. We can also use compressors on the mixbuss, or drum buss to help gel a group of sounds together and make them work as one a bit more, in this kind of use it’s very easy to over-do it and sap the power from your music. So that begs the question…
When, where and why should I use a compressor?
Now we know what a compressor is, and what it was originally intended to do. Let’s have a think about where and when we might want to use a compressor in a house track. Let me preface everything here with something to keep in mind at ALL TIMES; Dynamics are good, they are what make your music sound alive, they make your beat pound, your snares crack and keep your music sounding like its moving with a rhythm. So you want to preserve them in your mix at all costs. The compressor is a tool for controlling dynamics, not for destroying them or getting rid of them, so don’t think the ideal end result of a compressor is to end up with a flat barren wasteland of heavily crushed audio…it’s not. You use the compressor in many different ways to control dynamics, and to make everything work well in the mix.
Using a compressor to help a drum cut through a mix
Say you have a kick-drum, but it’s not very snappy and you just need to make it cut through your mix a little bit – one of the ways you can achieve this is by setting your compressors’ attack long enough so that it allows ALL of the transient of the kick through. Then as you lower the threshold until the compressor bites down on the body of the kick it will still let the attack through, effectively increasing the amount of attack the kick has by adjusting the balance between it and the main body of the sound. It’s important to play around with the attack setting here while listening in the mix to see where you get the best balance between sounding natural and good, and cutting through the mix. Be careful not to overdo it you are basically shaping the envelope of the sound and its easy to make it sound unnatural.
Using a compressor to bring out the body, and release of a sound
We can also use a compressor to help bring out the body and the release in a sound, if you set your attack a little shorter – so that it’s working on the transient also, the compressor will reduce the dynamic range of the sound overall as the higher level of the transient will trigger more compression. This means that when you raise the gain after you have effectively got a higher average level. So if you have a short attack it will work harder on the attack, bringing that down and effectively bringing up the body and tone of a sound. You might also try having a short release time which will allow the compressor to release quickly bringing up the tail of the sound. Be careful with this though as you might bring up unwanted noise, make sure you’re not hitting the sound with too much Gain Reduction by working with the Threshold. The watchword here is subtle.
This technique is also very useful when you have a drum sound which is sticking out in a mix a little, it will have the effect of softening the attack which can help things slot into place.
Release / Pumping – The good, the bad and the ugly
We all love a bit of pumping house (or at least we should do), so lets not forget one of the most important controls on the compressor, the release. If you set this short the compressor will be letting go of the sound very quickly which can sound great, really add some life to things, but you must always be wary of a few things:
Unwanted Artifacts: this is where your compressor is audibly working on the file and pushing down / bringing up audio that’s possibly not altogether musical. This can come about because you’re compressing too heavily and your release timing is too short or long. Or if you have your attack and release too quick and your threshold too low you will eventually find a distortion sound.
Timing: this is very important with the compressor. If the rhythm of your compressors’ action is out of time with your music it can really sap the energy from a performance. For example if your compressor hasn’t yet released after a peak, the transients that hit after it can be smothered – so you need to work with your release timing so that it’s in time with your beat. Bear in mind that the timing will be different for the amount of compressor / threshold / input signal you have.
If your release is too quick and your compression too heavy you could find you’re also bringing up non-audio or noise in-between your sounds as the compressor squashes the sound down and then releases to bring up the dirt. (could be artistically viable if that’s what your after?)
A good trick is to keep an eye on your Gain Reduction meters. Every compressor will have one of these to tell you how hard it’s working, if you notice the meter never returns to 0 then try a faster release or less threshold until it just starts to return to 0 now and again in time with the music. It’s good to keep an eye on this meter, as you can get a visual idea of whether your compressor is working with the music in terms of the timing, or against it.
Infinite Ratio
Some compressors offer a Ratio selection which can go all the way to Infinite:1 or some high number. What this means is that it will let hardly anything through the threshold apart from the attack period you set. This is basically limiting and can be used when you need to be a bit more aggressive in controlling the dynamics and peaks. This mode will work the compressor a lot on every peak, so be aware that it will be more audible and noisy and not so subtle.
Buss Compression
There are 2 ways of thinking about buss compression, two schools of very valid thought (there’s probably many more but we will look at 2 here). Both looking for the same general effect of controlling the dynamics of a mix of sounds, or the track as a whole, to improve the togetherness of the whole song, and to add a gel and a touch of uniformity and unity.
The first group of people like to mix into a compressor, so that means having a compressor across your mixbus from the very beginning of your mixdown, this way every mix decision you make while you’re working will be coloured by the effect, and the resulting balance you get will be different.
The second way of thinking is to add compression afterwards – in the mastering stage after performing your mixdown dry, with no major dynamic effects on it.
To be honest both ways are valid, and you can argue for both in terms of sound. They do sound different so it’s better if you try each and see which you prefer. When mixing into a compressor you can do things such as push your kick into the compressor a little harder than usual to make it dominate a little bit more and push the other sounds around, as when your mixing into a compressor as you raise the level of a sound it will trigger the compressor more. The only way to see which way is better for you is to try it.
The settings for a mixbus should be set subtle at first, I rarely use more than 1-2db of gain reduction. The attack and release times are crucial as always, make sure you let enough of your attack through as to not stifle the kick, and make sure the release time is timed to the rhythm of your song. For buss compression you should be using a low ratio, 2:1 and below. This ensures that there is nothing too violent happening to the mix, so things can be kept nice and smooth which, when your effecting a whole group of different instruments, is very important. When setting your attack its important that you set the attack careful so that you keep the attack of your drums in the mix, so start with a longer attack and make it shorter until you feel the dynamics of your kick and snares or most prominent drums start to fade. When you find the point that it starts to bite into the drums back it off a little and try and find a sweet spot you like. Then set the release so the gain reduction is return to 0 before the next beat, snare or whatever it is in your mix that is rhythmically important. This way you will get it working in time, and preserving the attacks to get a nice punchy sound.
Another feature that is very useful in a buss compressor is the sidechain filter – this is often included as a handy way of making sure the sub bass of your kickdrum doesn’t swamp out your compressor. The sub will often be the thing to make your compressor work the hardest, so having the option to let the lower frequencies go straight through without triggering things can be really handy if you find it’s working a little too hard on your mix, or that your bottom end has really lost it’s impact.

Over compression / bad compression – there are few rules in music but it’s easy to get it wrong
The only rule in music is “does it sound good”, simple right? Well I wish it was! It’s funny how our minds work – we can get drawn into a technical process of working on a sound and lose sight of that one basic fact. The fact you made a sound stronger, more shiny or given it more punch doesn’t always mean its musically better. This is something you need to work at to keep your objectivity – it’s not easy. Many times I hear songs released which are slammed flat, badly compressed or pumping in an ugly way. The normal use of a compressor will always be transparent to the music of your song, the audio should be shaped but not in a way that can be heard overtly. As usual, this isn’t a hard and fast rule, we all know of french house and other styles of music which partially relied on these compression artifacts. Many pieces of hardware have other pleasant and musical effects such as subtle distortions which can make the use of them vary slightly, but it is most important to be aware of what your trying to achieve, and what not to do before you start breaking the rules and taking advantage of abusing the equipment.
Presets
As you can tell from everything we have discussed here, compression is something that is VERY dependent not only on what you are compressing, but on what you are trying to achieve. Each sound is different, and the settings you need to use to get a good sound in a certain situation will vary greatly, so I would say try and steer clear of loading presets that come with a plugin as generally they wont work right out of the box. Always tweak the threshold, attack and release to get the right transparent effect.
Other designs
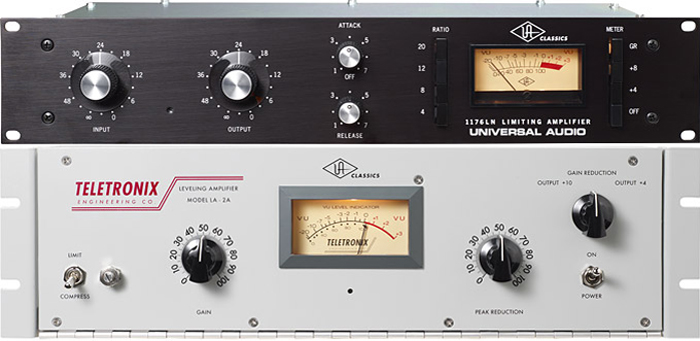
Some compressors can offer even less in the way of controls, such as the LA2A and others can offer more features, so you could be left with no control over the attack and release, which is all done automatically and programme dependent or at a fixed amount. Your control is pretty much using the input control or gain reduction control to control how hard you hit the compressor, and the output knob or gain to set your output level or some mixture there-of. This kind of compressor can sound great, especially the old analogue equipment – it can have a vibe of its’ own, but it’s still important you listen to what it’s doing to your sound and make sure you’re not over-cooking it. Your will also find auto timed release on a lot of compressors. If you are unsure about this it’s good to try it, sometimes it’ll work really well, but always make sure you have a mess around to see which setting is most musical for your ear. Obviously, without those controls the functions you can put this compressor to work on are also limited.
Fix for the mix
I think nowadays compression is looked at as a fix for everything. The tool that gets you a powerful, tight mix which hits hard and sounds lush. When in reality, it’s not. It has a massive part to play but if you’re just starting to play with compression now it’s important to know, as with everything in music, it’s a 5% thing, a small fraction that matters a lot when done well. If you compress a well- arranged and mixed drum track by 1db, it can sound fantastic and really bring it all together, but only after your get the rest of the steps right. Think of a game of chess: you can’t take one of your Pawns in the first turn and take the enemies’ Queen, there are a whole series of moves you need to make before you get into the right place to make that move. Compression is just one step.
If in doubt, always air on the side of caution – raise the threshold a little, and see if you can get a better sound by backing off a little.
Parallel compression – for the best of both worlds…sometimes
One of the more interesting techniques to try if you find you really like the sound you’re getting from a compressor, but to get that sound the life has been lost from a sound.
All this involves is running your heavy compressed sound, and mixing in a bit of dry uncompressed signal – this way you can regain some of your dynamics whilst keeping the artifacts of the heavy compression that you like. This is often good to use on a mixbuss or drums. So you can still have impact whilst getting more tone, dirt and presence. Playing with the mix between the Dry Signal and the Compressed signal to get the best balance for your taste makes this a very powerful tool. The sky’s the limit when you think about getting creative with these techniques, why not EQ the 2 channels differently?